無料証明書
ドメイン所有者なら無料で SSL 証明書を発行するLet’s Encrypt が利用することができるようになったので早速挑戦
参考にさせていただきましたサイト
Webセキュリティの小部屋
CentOS6.x で Let's #letsencrypt
# yum -y install git
python27が動作要件になっているようで、CentOS6系は以下が必要、7系は不要です。
# yum install centos-release-SCL
# yum install dialog
# yum install python27 python27-python-tools
# scl enable python27 bash
ここからは共通です。
# cd /usr/local
# # git clone https://github.com/letsencrypt/letsencrypt
# cd letsencrypt
ここでapacheを停止しておく必要があります。
# ./letsencrypt-auto --help
または
# ./letsencrypt-auto --verbose --agree-dev-preview --server https://acme-v01.api.letsencrypt.org/directory certonly
6系でエラーがでて進まないマシンがあった。
libffi-3.0.9-1.el5.rf.x86_64 rpmforge版がはいっているとダメなようです、
強制的に上書きました。
# wget http://ftp.tsukuba.wide.ad.jp/Linux/centos/6.7/os/x8 6_64/Packages/libffi-3.0.5-3.2.el6.x86_64.rpm
# wget http://ftp.tsukuba.wide.ad.jp/Linux/centos/6.7/os/x8 6_64/Packages/libffi-devel-3.0.5-3.2.el6.x86_64.rpm
# rpm -ivh libffi-3.0.5-3.2.el6.x86_64.rpm libffi-devel-3.0 .5-3.2.el6.x86_64.rpm --force
再度挑戦
# ./letsencrypt-auto --verbose --agree-dev-preview --server https://acme-v01.api.letsencrypt.org/directory certonly
Bootstrapping dependencies for RedHat-based OSes...
yum is /usr/bin/yum
Loaded plugins: fastestmirror, security
Setting up Install Process
Loading mirror speeds from cached hostfile
* base: centos.usonyx.net
* extras: centos.usonyx.net
* updates: centos.usonyx.net
~途中省略
Use of --agree-dev-preview is deprecated.
Version: 1.1-20080819
途中メールアドレスの入力を求められます。

作成する証明書のホスト名を入力します。

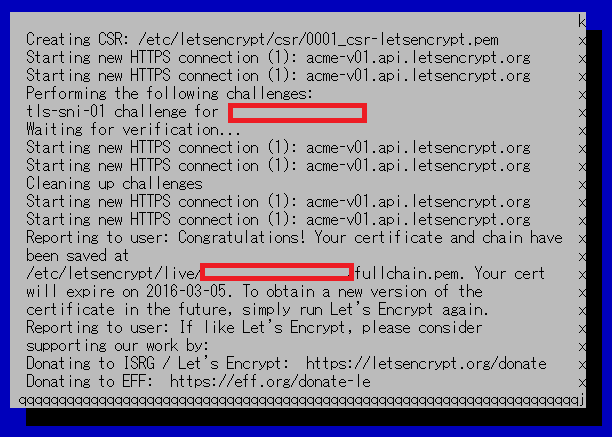
無事完了 (赤枠にホスト名が入ります。)

IMPORTANT NOTES:
- Congratulations! Your certificate and chain have been saved at
/etc/letsencrypt/live/xxxx.yyyyy.com/fullchain.pem. Your cert
will expire on 2016-03-05. To obtain a new version of the
certificate in the future, simply run Let's Encrypt again.
- If like Let's Encrypt, please consider supporting our work by:
Donating to ISRG / Let's Encrypt: https://letsencrypt.org/donate
Donating to EFF: https://eff.org/donate-le
/etc/letsencrypt/live/ホスト名配下に証明書が作成されています。
cert.pem サーバ証明書
chain.pem 中間証明書
fullchain.pem サーバ証明書+中間証明書
privkey.pem サーバ秘密鍵
サーバ秘密鍵、サーバ証明書をApacheに設定して起動すれば確認でます。
有効期限は90日となっていました。